Saturday, September 30, 2006

Crafts: Laptop Cozy...The Big Day

[Catch up on the drama of Parts I and II of this Laptop Cozy series HERE--Part I and HERE--Part II.]

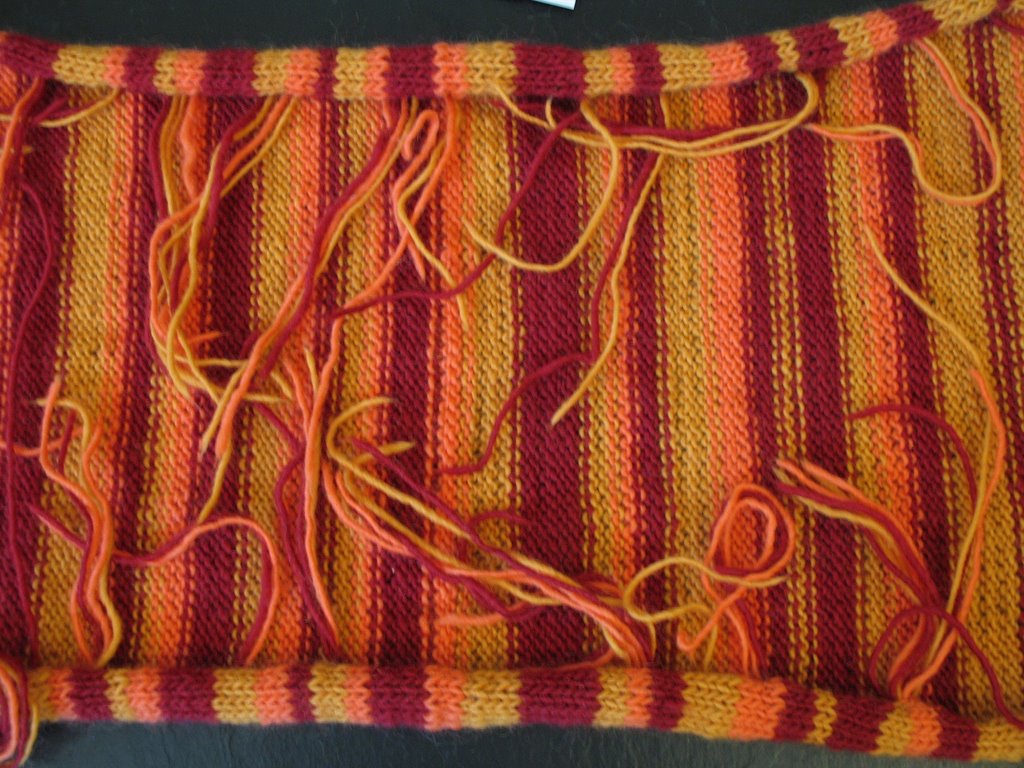
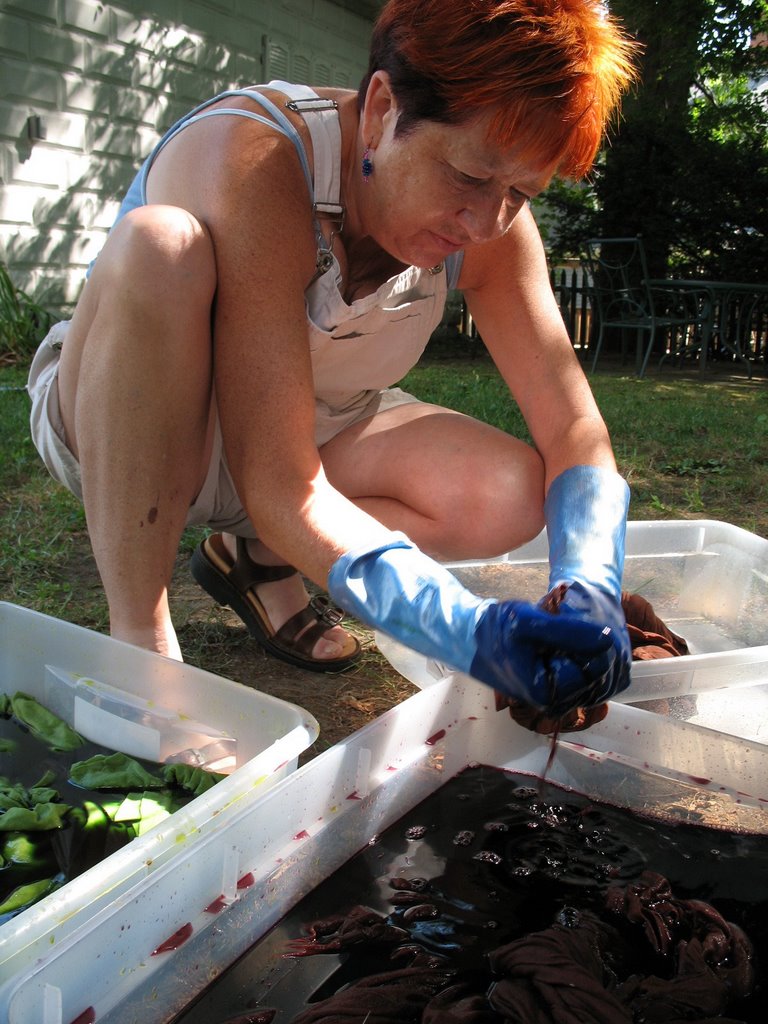
It's been a long, hard road, my friends. The cozy is complete. Ends are all woven in. Garbanzo beans are all tucked into little pouches and lovingly wrapped in cut-up zip lock bags. It's been through the washer and the ringer to boot. Results are in...

But FIRST, for a bit of delayed gratification, a little lesson on felting! True, honest-to-goodness felting is a bit different than the kind of felting I'm talking about. Felting, like Fedora hat felting, is very similar to making hand-made paper. Basically, it is done by taking carded, unspun wool (also called roving), getting it wet, and placing it in layers into some sort of mold. As the wet wool is agitated, the little fibers will tangle with each other, creating a solid, tight mass. Let it dry and you have a solid piece of fabric that can be molded into something like a hat or used in kindergarden dioramas of cave-man dwellings.

When we talk about felting with knitting, it's essentially the same process, but using spun and knitted fiber. Instead of going at it free form, we knit a very big, loose item, get it wet, and agitate it to get the fibers to tangle together. The piece will 'shrink' and become a thicker, more solid piece of fabric--exactly what happens when you accidentally throw your favorite winter sweater in the wash. (Interestingly enough, it's the washing process, NOT the drying process that causes your favorite sweater to felt and shrink.) Yarns made of any kind of animal fibers (like wool) and that have not been pre-treated to be machine washable ("superwash") can be felted. Yarns made of plant fibers like cotton, flax, or bamboo don't felt very well, though I've heard of felting experiments combining a thread of plant fiber and a thread of animal fiber. If you're planning a felting project, it's really really key to knit and felt a sample swatch. Every yarn felts a little differently and swatching is crucial to determine the gauge for your original, pre-felted piece. In general, a piece of knitting will felt (shrink) more vertically (top to bottom) than horizontally (left to right).

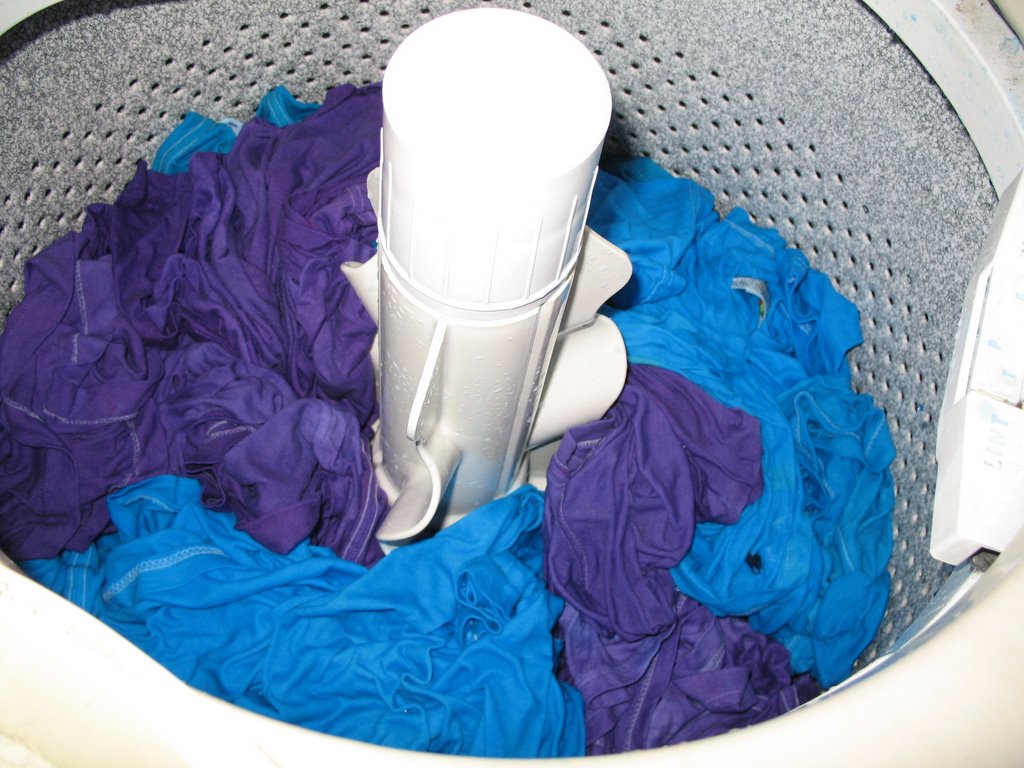
To felt an item, first knit something rilly rilly big on relatively large needles. The looser you knit, the more the piece will felt because there will be more room to agitate those fibers. If the knitting is tight, there will be less agitation and less felting. Put the finished piece in a zippered bag (like a pillow case)--this will prevent your washing machine from getting clogged with little rats of loose fiber. Throw this in your washing machine along with a couple of pairs of old jeans (NOT TOWELS) and about a tablespoon of detergent (any kind). Put your washing machine on the lowest load setting and the hottest water setting. Let 'er rip! Check your piece every five minutes to see how the felting is coming along. You can keep repeating the first part of the wash cycle as many times as you need to. When it's the size you want, take it out of the washing machine, let the washing machine run until the cold water part of the cycle, and dunk your piece back in to get out the last traces of detergent. Many places advocate removing your piece before the spin cycle as sometimes spinning it can leave wrinkles in the fiber, but I've never had this problem. In general, I feel the risk is worth it to get out as much excess water as possible. All that's left to do is block your piece and let it dry. There's a good article about felting on Knitty.com: http://knitty.com/ISSUEwinter03/FEATfelthis.html
.

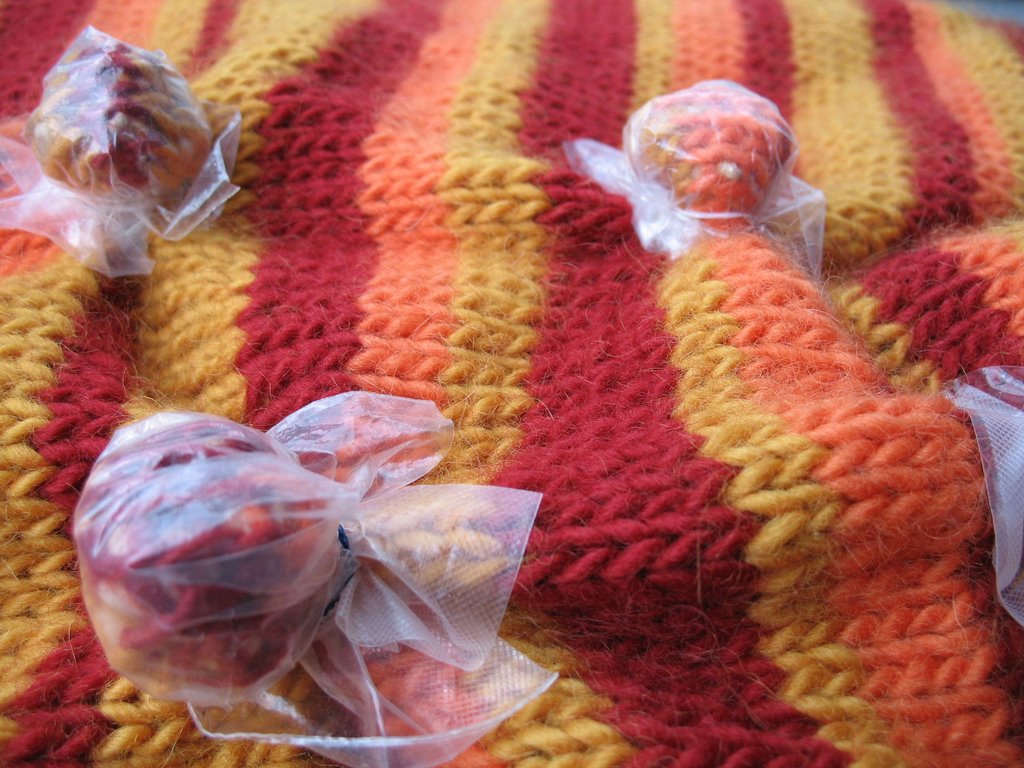
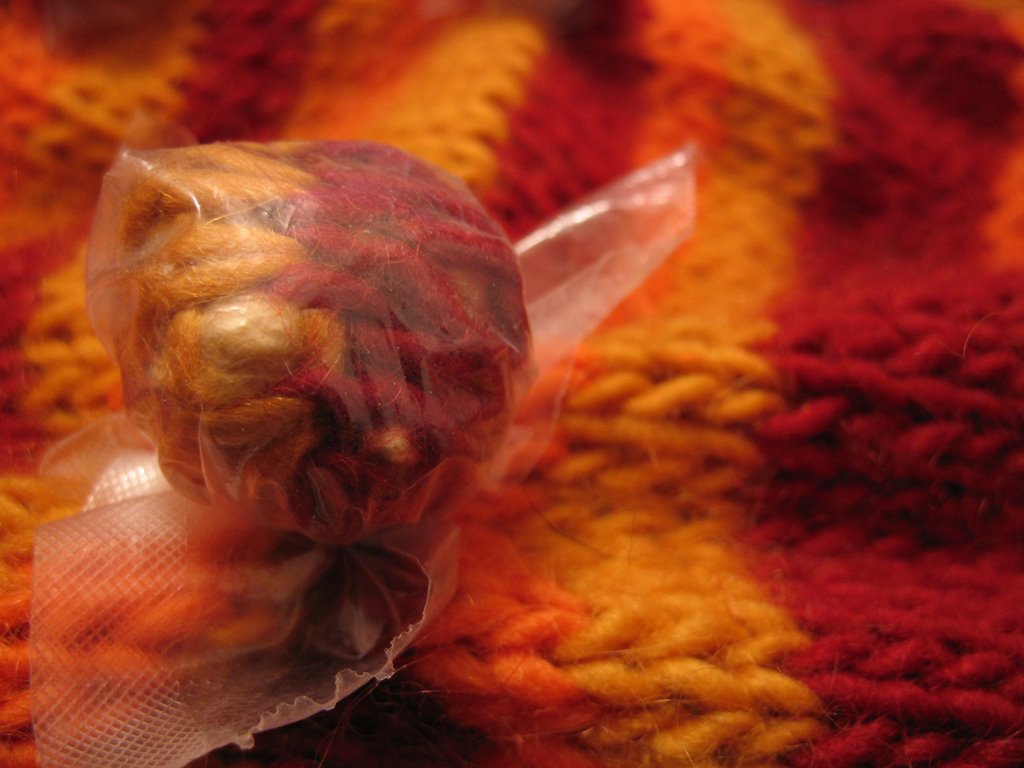
Ok, blah blah blah, give us the good stuff! My friends, wait no longer. (P.S. Click on any of the pictures to see them larger--some of the detail is amazing, but hard to see in the smaller size.)

This is the finished, pre-felted laptop cozy. My idea was to have a fewer number of large nubs at the bottom and gradually move to more, smaller nubs at the top. The large nubs have about ten garbanzo beans stuffed in them and the smallest nubs have three. I ended up using cut squares of old zip lock bags instead of simple plastic wrap because I was worried the plastic wrap might actually melt in the hot water and figured the zip lock bags would be more durable. I used cheapo rubber hair bands to secure the nubs. Pre-felted size was about 18.5x22 inches.

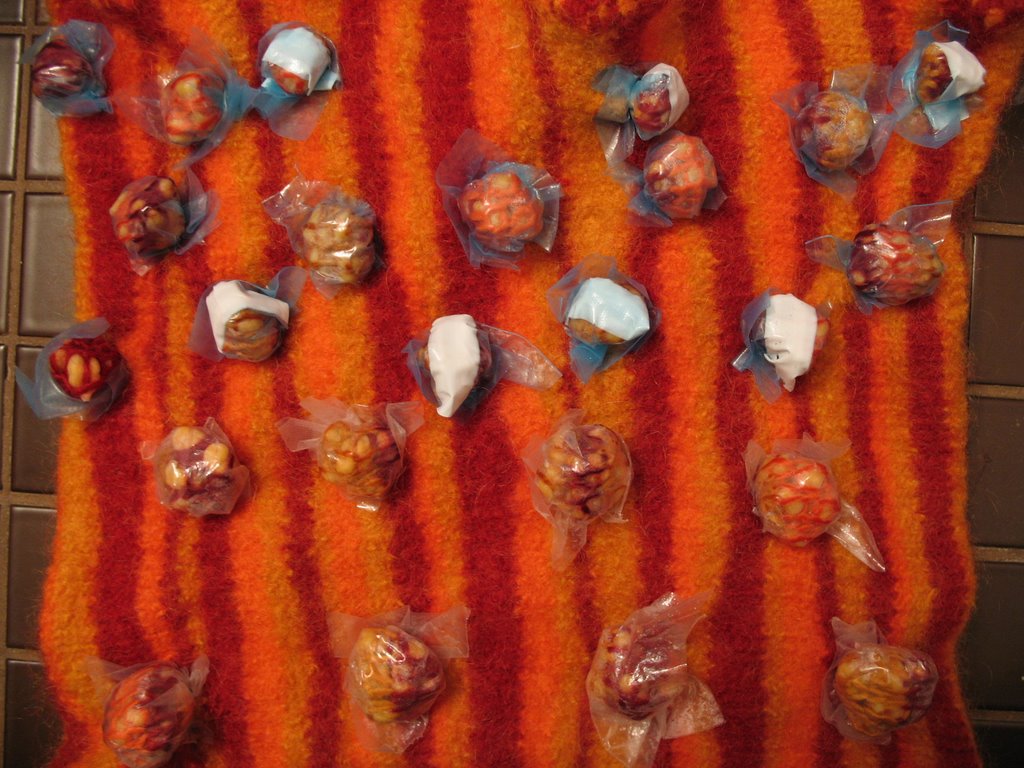
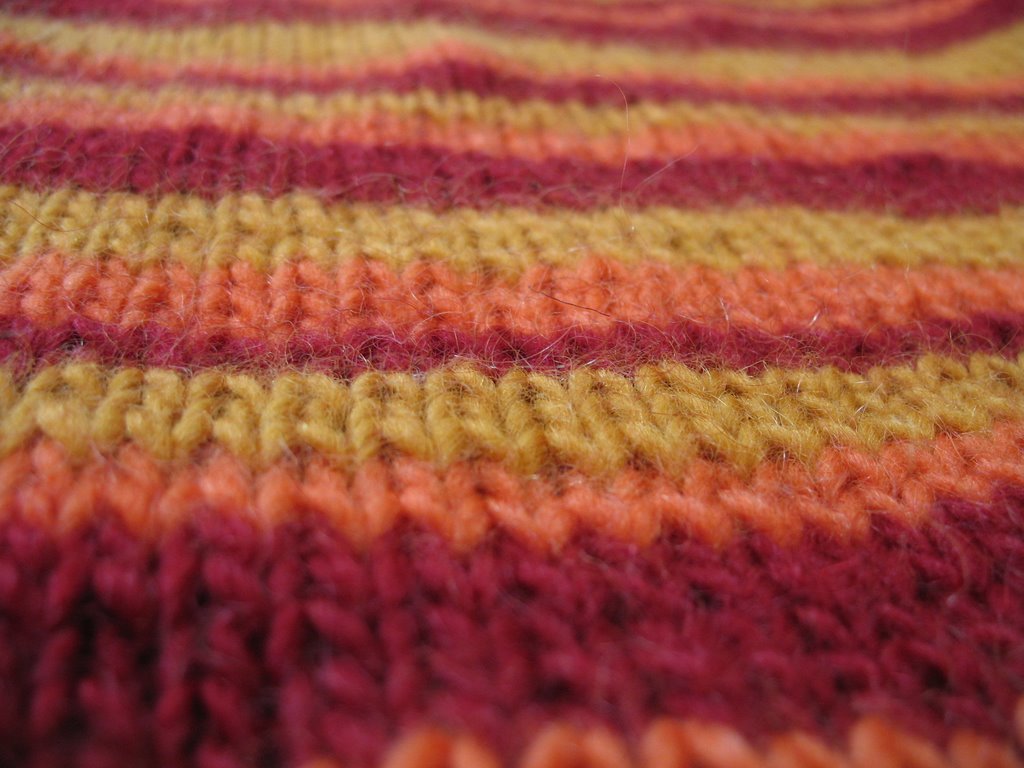
And it felted beautifully. The fabric is really seamless and tight with barely a trace of the original stitches. You can already see in the pictures above that the fabric in the nubs didn't felt at all. Boy was I nervous to take them off, though!

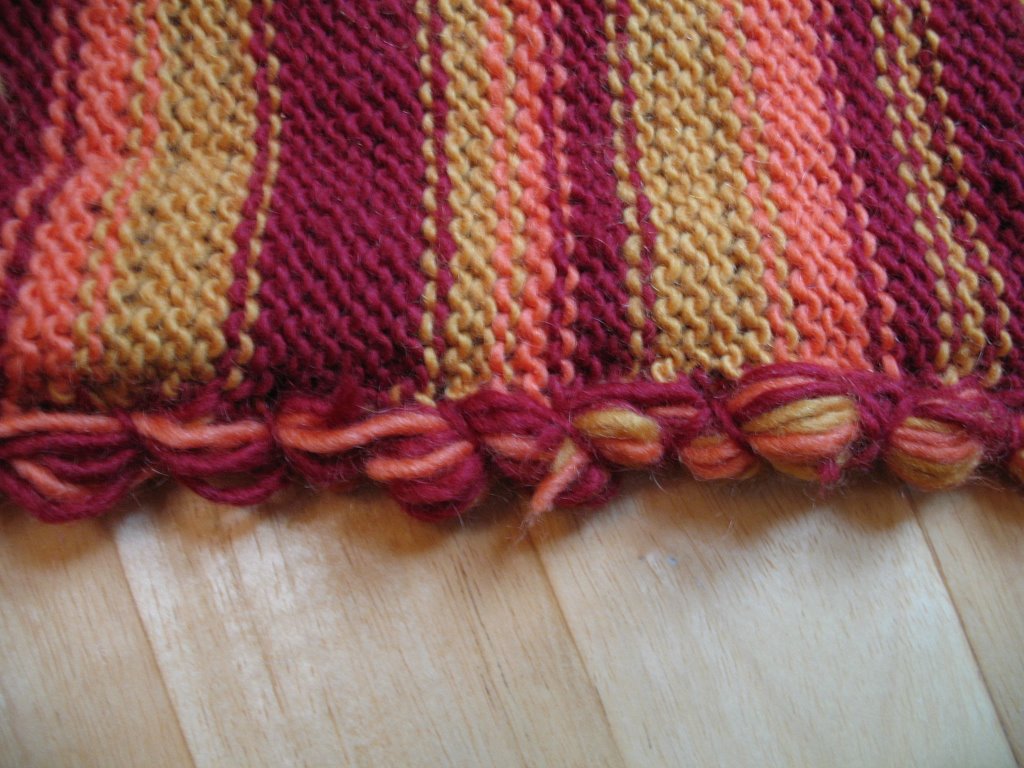
And, ta-DA! There are the nubs! Don't they look like little cheese balls you want to pick up and pop in your mouth? Below is the full piece being blocked, and then progressively closer details of the nubs. The final piece measures about 11x14 inches.
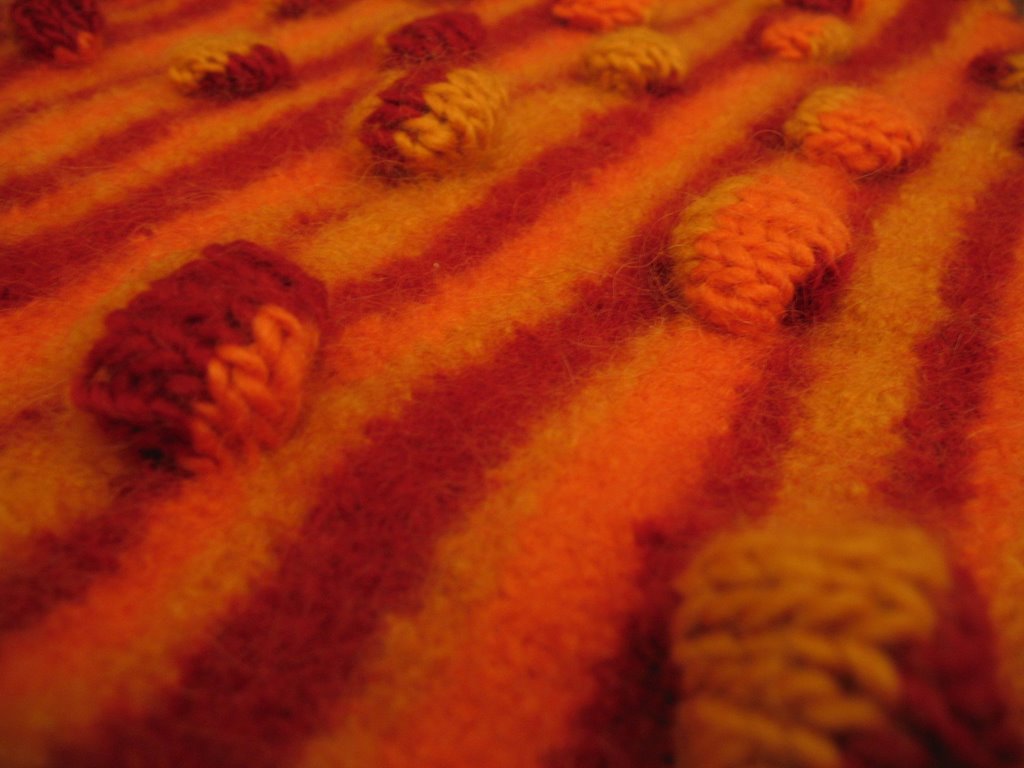
When dry, those little nubby baubles pop right up. Of course now that it's all done with, I'm already wishing I'd done more nubs and in a different arrangement, but then again, because the pattern overestimated the amount of yarn needed, I do have enough left over for another entire bag...

And here's another thing--maybe y'all can help me decide:
When I first took the plastic wrap off, I thought the nubs were cool, but wasn't sure I really liked the un-felted nub look for this particular piece. But now that I've been looking at it for a few days, I'm torn. I'm thinking about throwing the bag into the washer to felt again, this time withOUT any covering on the nubs. My idea is that I would felt it just enough so that the nubs softened and felted a bit, but were still obviously, well, nubs. I'm also kinda tempted to do it just as an experiment to see what it looks like (since we've already determined I'll soon be doing another bag, obviously). What do you think, oh ye sage crafters and opinion-holders?

Sunday, September 24, 2006

Crafts: Laptop Cozy Update

The hour is nigh upon us. The laptop cozy hovers on the brink of completedness. I debated waiting to post anything until it was actually 100% and truly finished, but where's the fun in that? Plus, I think I might need a bit of hand holding through the potential disaster I have created.

So, the laptop cozy is probably one of the simplest patterns in existence. It's so easy that I have absolutely no plagiarism hang-ups about sharing it with you (though the original pattern can be found in Alterknits by Leigh Radford): cast on 65 (80, 80) [for small (medium, large)] and work in stockinette stitch until the piece measures 44 (50.5, 57.5) inches from the beginning. Bind off and fold the piece in half. The folded edge becomes one side of the bag. Sew the bottom and the other side shut using your favorite fancy sewing method. Weave in loose ends. Felt. Use scissors to cut handles. Presto chango, laptop cozy!

I made the small size bag, which calls for two skeins each in three colors of Lamb's Pride Worsted if you want stripes, or six skeins in a single color.
First off, I didn't use anywhere NEAR this much yarn. In fact, I only used three skeins and still had some left over. I was a bit disgruntled about this because, as you may recall from my earlier post, I actually had three skeins already, but since the pattern called for six, I made a public display of myself by picking up the extra skeins from my local yarn store while out on a run. Anywho, at least the experience still makes for a good "yarn" (oh! oh! Ouch!).

I liked the striping pattern in the book, so decided to follow it instead of making up my own. The striped ranged in width from two rows to seven rows. Since the final piece was going to measure 44 inches, this translates into a lot of striping, my friends. It didn't occur to me until, oh, about 3/4 of the way through that this also translates into a lot of loose ends. That I would have to weave in. Later. Dear Lord. I smacked myself on the head and said, "This is what INTARSIA is for!" Intarsia is where you essentially have two balls of each color, one for each side of the piece. You end up not having any loose ends to weave in. (see more thorough explanations here and here.) Since intarsia is usually used when you're knitting some sort of complicated pattern like argyle or letters, it didn't occur to me to use it here (although now I'm wondering if this is why the pattern calls for six skeins when only three get used? Still seems a bit excessive, even so). Alas, my intarsia-revelation was too late to be of real use for me, but please learn from my experience. The idea of weaving those ends in was so effing annoying that this project was almost relegated to the "I can't deal with you until at least several months from now" pile.
Look at all those ends! Bleck!

In the end, rather than actually weaving in all the ends, I decided to do a whip stitch along the bottom edge and a mattress stitch across the top (cu
z it's prettier and this is the part that will be seen), and gather in the ends as I go. I'm not sure how well this will felt, but it seemed preferable to weaving them all in. Fingers crossed.

Bottom ends woven in with a whip stitch
Top ends woven in--I think this is called a mattress stitch

Ok, at this point a sane person would be all hunky dory and ready for a good afternoon of old fashioned felting. But I kept looking at the finished, un-felted bag and thinking, "You know? I think I could do something more here." That's when I remembered a scarf that my mom once described seeing at an art fair she went to. It was a basic felted scarf, but there were all sorts of little...well...bubbles all over it. The way Mom described it, I pictured a clean piece of felted knit fabric, but with the kind of nubs you'd get if you were doing short-row shaping--like the heel of a sock. Mom said it was one of the most incredible (and expensive--$350 for a scarf!?!) things she'd ever seen, and she asked the artist how she'd done it. The artist said she took a piece of knitting that she was going to felt and tied bundles of garbanzo beans into the fabric, covered it with plastic wrap, and then proceeded with the felting. This way, the regular fabric felts, but everything covered by the plastic doesn't.

I've been eager to try this technique out for myself ever since Mom described it to me, but never had quite the right project. Until now! Yessiree, we're gonna get cre-AH-tive over here in Boston! Below is a picture of what the nubs look like so far. I gathered a bit of the fabric, popped in a few garbanzo beans, and secured a piece of plastic wrap over the whole nub with hair bands. I'm going to finish tying them up during the Patriots game tonight (cuz what's football for if not guaranteed, uninterrupted knitting time?), and then felt them tomorrow. Wheeee!

Tuesday, September 19, 2006

Cooking: Canning Inspiration


A little inspiration for all my friends out there madly canning and preserving and freezing little bits of summer for the months ahead. You're all such good little squirrels. This is from my new favorite artist Johanna Wright: http://www.johannawright.com.

Sunday, September 17, 2006

Cooking: Basic Pasta Sauce

Quickie post this lazy Sunday afternoon--just wanted to share my basic pasta sauce recipe with all y'all. For the longest time, I didn't question the fundamental American assumption that pasta sauce comes in jars. Period. No further thought required. Then one fateful shopping trip, while tenaciously deciphering which pasta sauce had the cheaper unit price and then asking myself if this was a sauce I actually desired to consume, it hit me. I could actually make my own pasta sauce. My own! Let me share a little secret with you: at its most basic, pasta sauce is really just...wait for it...tomatoes. Yes, tomatoes. Eureka!

Now there are about a hundred bajillion recipes for tomato sauce (basic pasta sauce) out there. By all means, go forth and sample. But if you're like me and the idea of making your own sauce is a novel shift of paradigm, here's a good place to start. The veggies I give below are my basic mix, but you can certainly add or subtract based on what you have in your fridge and your tastes.

A note on the tomatoes: If they're in season, sauce made from fresh beefsteak tomatoes is to die for. Plan extra time for it, though, as it takes a good hour or so for the tomatoes to simmer down into a sauce. However, if it's the middle of winter, if you're short on time, or if you just don't feel like it, a can of diced tomatoes is a perfectly reasonable substitute. There is no shame in home cooking. Get a 28 oz can of your grocery store fav--
I use "Nature's Promise" brand from Stop&Shop, from their new line of organic products. You can usually find cans with Italian spices or without, salted or not. If you want quick and easy, go for the pre-spiced stuff. If you're feeling adventurous, go for no spices, no salt and add your own.

A note for folks on Weight Watchers: The only ingredient adding points to this sauce is olive oil. Since such a small amount is used, I usually average this out to about 1/2 of a point (just to keep me honest). If you add in the wine, kick the sauce up to a whole point. Serve 3/4 cup of sauce over a cup of pasta for a good meal for just around 5 points.

----------

Emma's Basic Pasta Sauce
makes 6-8 servings

28 oz can of diced tomatoes with the juices--with Italian spices or not
or 2 pounds or more of beefsteak tomatoes (about 4 large), cored, peeled, and cut into 3/4-inch chunks

1 whole sweet onion--diced
1/2 large (or 1 small) zucchini--diced and salted (salt draws out the liquid in the zucchini)
1 red pepper (or orange or yellow)--diced
1/2 package of mushrooms--sliced (about 1 cup sliced)
3 medium-sized cloves garlic
2 cubes of veggie, chicken, or beef bouillon (I like using bouillon instead of broth for the concentrated flavor and to keep the amount of liquid used in the sauce at a minimum)
1-2 tsp olive oil
1/4 cup fresh basil or 1 tablespoon dried basil
salt and pepper to taste
1/2 cup of red wine (optional)

Heat olive oil in a large sauce pan or wok. Add onions and zucchini, and saute until barely translucent. Add garlic and stir until fragrant (about 30 seconds). Add peppers and stir until onions are fully translucent and zucchini is almost cooked through. Add mushrooms and saute for a minute or so. (If making sauce from whole tomatoes, do not cook the veggies as fully before adding the tomatoes. They will cook more fully as the sauce simmers.)

Add canned tomatoes (or diced whole tomatoes) and allow to come to a boil. Once boiling, add bouillon cubes, basil, and other spices. Reduce to a simmer. If using canned tomatoes, start water boiling for pasta. If using whole tomatoes, allow to simmer until sauce reaches desired consistency--between 45 minutes to 1 1/2 hours. In either case, stir occasionally.

Just before serving, stir in 1/2 cup of red wine if desired--this will give your sauce a nice depth of taste. Also, make sure the bouillon cubes are completely dissolved. There's nothing like chomping down on a bouillon cube to put you off salt for life. Or at least the next several minutes. But at least the faces you make will provide endless entertainment for any nearby guests, children, or other various loved ones.

Sunday, September 10, 2006

Cooking: Fortune Cookies

A few weeks ago, one of the departments in my company became inundated with projects that had moved down the conveyor belt to their desks and all the folks in that department were suddenly up to their ear lobes with paperwork and books and e-mails ever-so-politely requesting status updates on particularly gnarly projects (some of which MAY have come from yours truly). Part good wishing, part joke, part peace offering, I made the whole gang a batch of personalized fortune cookies.

I'd been rarin' for an excuse to make these cookies ever since I saw it while flipping through a back-issue of Cooking Light at The Engineer's mom's house. They looked like such fun to make, relatively easy, and healthy to boot. All these predictions turned out to be true, but I have to admit that I was a bit disappointed with the actual cookie itself. While the cookie part of a fortune cookie is really just a clever vehicle for the afore-mentioned fortune, I still think the cookie should be worth snacking on. These cookies certainly tasted like Chinese restaurant cookies, but had none of the satisfying snap that comes when you crack it in half or the melty crunch of actually eating it. My cookies stayed relatively limp and chewy--interesting, to be sure, but not *quite* what I was going for. I'm wondering if a different mixing technique might be in order. Any suggestions?

Here's the recipe--por favor, give it a try and let me know your thoughts:

---------

Fortune Cookies
with grateful acknowledgement to Cooking Light magazine

Makes roughly 18 cookies

1/2 c. bread flour

1/2 c. sugar

1 tsp vanilla extract (almond or orange extract might be yummy too!)

2 large egg whites

20 fortunes (a few extra just in case) roughly 3 inches long by 1/2 high

Pre-heat oven to 400 degrees.

1. Combine all ingredients and mix until well blended. You should have a thin batter similar in consistency to icing or glaze (mine was just a bit thinner than pancake batter). Cover bowl with plastic wrap and chill 1 hour.

2. While batter is chilling, cover two large baking sheets with parchment paper. Using a biscuit cutter or drinking glass about 3 inches in diameter, trace three or four circles in a row along the middle of the paper. Turn paper over.

3. Spoon about 1 teaspoon of batter into the center of each circle and use the back of the teaspoon to spread the batter evenly over the entire circle.

4. Bake one sheet at a time for about 5 minutes or until the edges of the cooks are just started to get brown and crinkly. Remove from oven.

5. Use a spatula to release the cookies from the baking sheet. (Don't afraid to be tough.)

6. Working quickly and doing one cookie at a time, place the prepared fortune along the center of the cookie. Lay the handle of a wooden spoon or a chopstick along the fortune and fold the cookie over so the edges meet over the spoon handle. Press edges together. Remove spoon.

7. Pull the ends of the cookie down over the rim of a small bowl. Hold for a few seconds until set and then place cookie on a wire rack to cool completely. Repeat with remaining baked cookies.

8. Repeat entire procedure until all the batter is used. Store in an air tight container.

Calories: 37; Fat: 0.1 g; Protein: 0.9g; Fiber: 0.1g; Chol 0 mg; Iron 0.2 mg; Calcium 1 mg

Friday, September 08, 2006

Books: Fun Home: A Family Tragicomic by Alison Bechdel

Fun Home: A Family Tragicomic
by Alison Bechdel

Quickie Synopsis: Fun Home is the story of Alison Bechdel’s multifaceted childhood, her guarded relationship with her closeted gay father, and her eventual realization that she herself is gay. Told in graphic novel form through illustrations, dialogue, letters, and journal entries, this is a memoir like none other. Readers familiar with her syndicated comic strip, Dykes to Watch Out For, will recognize Bechdel’s unique blend of dark humor, genuine sympathy, and fearless observations that cut right to the point. Part father-daughter story, part coming-out story, Alison Bechdel shows how intertwined these two narratives have become in her life.

----------

Bechdel crafts her novel in layers upon layers. Memories, experiences, and events link backward and forward along the timeline of her life and the development of the novel. As the reader, there is a feeling of uncovering each layer alongside the author: the journey through her memories is both unexpected and inevitable. Indeed, the level of introspection she reveals in her memoir points to a level of self-awareness that borders on the super-human or, perhaps, several years with a very good therapist. Bechdel’s overall tone is one of melancholy and relief, as if the crafting of the novel was in itself a cathartic experience, and now that the story has been told, she is released to move on in her life.

Additionally, this is simply an aesthetically beautiful book. From the bright orange cover that contrasts so gorgeously with the teal dust jacket and inside cover printing to Bechdel’s meticulous two-color drawings, no detail is overlooked. In her illustrations, Bechdel shows a clear mastery of her craft. Her line drawings are in essence quite basic—no splashy art school angles or over-dramatic shadowing—and yet she is able to convey complex emotions in the arch of an eyebrow and create a precise mood through the arrangement of characters and objects in a single screen.

Graphic novels are slowly gaining in cultural prominence and popularity, and Fun Home is right at the forefront of the movement. I highly recommend this book for anyone curious about the genre. Various reviewers have (favorably) compared Bechdel’s novel to Persepolis by Marjane Satrapi, but I honestly think that Fun Home is an all-around better novel. Unlike Persepolis, which I felt was a bit basic and simple (albeit well-drawn), Bechdel’s novel is truly a novel written in graphic form. It is as complex as any ‘regular’ adult novel, thoughtful and thought-provoking, and fantastically entertaining.

Sunday, September 03, 2006

Crafts: Dying T-Shirts

A little background: Last year for Christmas, a friend gave me a copy of Alterknits by Leigh Radford. This book is full of knitting inspiration--unusual projects, gorgeous full-color photos (including shots of my former city of residence: Portland, Oregon), and lots of extra notations on various techniques. The project that very first caught my eye was for a t-shirt rug. "These simple rugs knit up quickly in garter stitch on size 19 needles and give you something creative and useful to do with t-shirts that have passed their prime" the opening project description promises. "Perfect!" I thought. We inherited one particularly 'interesting' rug from the previous occupants of our apartment that I've wanted to replace for some time. And surely, I thought, we must have 26 adult large or extra large t-shirts lying around the apartment just waiting to be cut into ribbons and reincarnated as a living room rug.

Setback Numero Uno: Alas, 26 adult large or extra large t-shirts were not to be had. That's a lot of shirts, my friends, even for a pack rat like me. No problem--I decided to put up flyers around my office asking people for t-shirt donations. Interest was expressed, eye brows were raised, my status of resident office crazy person was reaffirmed, and the donations trickled slowly in.

Setback Numero Dos: Despite the generosity of my co-workers, I still didn’t have enough t-shirts for my rug. Following the advice given later in the introduction to the project, I decided to hop over to Goodwill to round off my t-shirt supply. Unfortunately, the t-shirts were quite a bit more expensive than I’d hoped. At $3 a pop and needing another 10 t-shirts, I realized I might as well go out and BUY a rug for around the same price. At this point, I was starting to get a bit discouraged.

Setback Numero Tres: While mulling over my options, I decided I could at least start cutting up the t-shirts I had. The directions (and common sense) say to start at the bottom and cut one solid ribbon (about ½ inch thick) upwards in a spiral until you hit the armpits, then discard the top of the shirt. Easy-peasy, right? These are supposed to be “simple rugs” that “knit up quick,” right? All I have to say is, “ug.” Cutting a single shirt took me a good hour and a half to do, and man did my hand ache afterwards. Lucky for me, I was entrenched in catching up on the first four seasons of CSI and had many hours of crime scene sleuthing to take my hand off the slow cramping of my fingers. (If any of y’all want to follow my example and try this project out for yourselves, be sure to equip yourselves with a good pair of fabric scissors. I can’t imagine trying to do this with an ordinary pair of Fiscars. Double ug.)

Ok, so far, so very discouraged. But, as our friends over at Mason-Dixon Knitting say, “No project is too ambitious if you crave the result enough.” The more discouraged I became, the more determined I was to see this project through. And it was with this realization that the Knitting Gods finally decided to smile upon me.


Enter my co-worker, G. Just as I was about to lose all hope, I walk into my cube one morning to find two huge bags absolutely STUFFED with men’s extra large white cotton s
hirts. My jaw dropped. Tears filled my eyes. I may have blubbered a bit. G. pops his head in and says, “Oh, you got my t-shirts, then? I kept forgetting to bring them in. Hope they’re ok. See ya!” There had to be at least forty shirts in those bags. A few days later, another co-worker, E., dropped off another bag stuffed with (primarily white) t-shirts. Then my mom says, “Say, when your aunt and I come to Boston, why don’t I bring along some of my leftover fabric dyes and we can dye those shirts?” My bliss was complete.

Here follows One Girl’s T-Shirt Dying Story:

The dyes we used came from Dharma Trading Company. This is the company My Mom the Artist has always used, and my teenage tie-dye wardrobe can definitely attest that their colors truly are as brilliant and permanent as advertised. If you want to undertake any dying project, I recommend using their products: http://www.dharmatrading.com/ and http://www.dharmatrading.com/html/eng/3796-AA.shtml?lnav=dyes.html.

Meet the Dying Crew: My lovely mom and lovely aunt. Their help and guidance was much appreciated. In fact, if it weren’t for my mom motivating me to do this and carting her left-over dye from Minnesota, those white t-shirts would probably still be languishing in my closet.

With our bounty of white t-shirts, we decided to mix up several vats of dye: lavender, turquoise, chartreuse, and chocolate brown. A vat of dye is essentially a proportion of powder dye, warm water, and LOTS of plain table salt. Soda ash is then added later in the process. Soda ash fixes the dye into the fabric so it doesn’t wash out or fade. How much of each depends on how many pounds of dry fabric you want to dye (instructions and details for the exact amounts of ingredients will come with your dye order.)


1. Dissolve the salt in warm water.


2. Dissolve the powder dye in a small amount of warm water and then mix it into the larger vat of salt water.


3. Add fabric to vat and allow to soak for about 20 minutes. During this time, the fiber is absorbing all the dye it can. It’s important for the fabric to be completely bone-dry so that it can absorb as much as it can.

4. Dissolve soda ash in a small amount of very hot water and then add it slowly to the vat of fabric and dye.


5. Stir frequently and allow to soak for 30 minutes to an hour.


6. Squeeze excess water from fabric.


7. Rinse with cold water to remove any excess dye. (Do this a few times—the water won’t run clear, but it should be lighter in color.)


8. Wash fabric with detergent in hot water in a washing machine.

In the first batch, the lavender, turquoise, and chartreuse came out wonderfully. The brown faded to a rather unpleasant dirt color, so we decided to re-dye it. We also had a lot more white shirts left over, so we decided to mix some new powder dye into the vats already made to make some new colors. Into the turquoise, we mixed royal purple and made a nice deep violet. Into the lavender, we mixed hot pink and made a warm maroon. Into the chartreuse, we mixed emerald green and made a lime-green. The colors in this second round didn’t ‘take’ quite as well to the fabric and faded during washing. Mom and I realized that this was probably because the soda ash that was already in the dye from the first round prevented the new dye from being adequately absorbed and fixed into the fabric. Ah, well. Live and learn.

Next step is to cut all these t-shirts into ribbons. I think this calls for a Harry Potter movie marathon, fo shizzle. "I crave the result...I crave the result...I crave the result..."