Tuesday, August 29, 2006

Books: The Spirit Catches You and You Fall Down, by Anne Fadiman

The Spirit Catches You and You Fall Down
By Anne Fadiman

Quickie Synopsis: When three-year-old Lia Lee arrives in the emergency room at Merced County Hospital in California in the grip of a massive epileptic seizure, a series of events is set into motion that will pit Western medicine against traditional Hmong medicine and that will leave all participants in the drama forever changed. Lia Lee is the daughter of two Hmong parents, refugees from Laos, and is diagnosed by the American medical system as an epileptic. However, her parents believe that Lia’s condition is spiritual in nature and resist the attempts of Lia’s American doctors (and ultimately the California state government) to interfere. The story of Lia and her family is at the center of The Spirit Catches You and You Fall Down and is the crucible in which Hmong and American cultures collide.


----------

I always approach any book or article written by a person of American or European descent who is attempting to explain another culture outside the author’s own cultural background with a great deal of skepticism. At best, these books tend to be dry academic texts with little or no ethos, and at worst, they portray the cultural Other as a noble savage proudly clinging to their uncorrupted societal roots and systems of belief. A very few of these kinds of books, and the very best, focus not on comparing and contrasting each culture, but on bridging the gap. This is what Anne Fadiman does in The Spirit Catches You and You Fall Down and she does it fantastically.

Throughout the story of Lia Lee’s illness and her progress through the American medical system, Fadiman ties in details on the history of the Hmong people, explanations of their medical and spiritual beliefs, and explorations of their community relationships. She makes no attempt to rationalize or otherwise “Westernize” Hmong behavior, and often outright admits that she remains baffled on several points. Instead, Fadiman lays everything out as best she can, supplementing snippets of interviews and excerpts from books and articles where needed, and gives guidance on how to best understand the information. Fadiman is fair in her portrayal and examination of both American culture and Hmong culture: she praises and criticizes both with equal measure, pointing out the strengths and weaknesses of each.

Beyond the content itself, Fadiman’s skills as a writer are what bring this story to life and give it the authority needed to carry through with such a difficult, complicated subject. Her pace throughout the book is steady, pulling the reader forward at a stately progress that is never so slow the reader loses interest, but not so fast that details are lost in a blur. Fadiman’s voice throughout is firm and respectful. She is confident of her facts and her research, but not domineering or overly didactic. Fadiman is also clear in her goals for the book and doesn’t overreach herself (as other books of this genre sometimes attempt) by trying to create a singular text on Hmong culture and history—the bibliography at the back gives an eager reader plenty of material to continue their edification.

Whatever your cultural background, it’s easy—no, that’s not the right word—it’s natural to accept behaviors from within your own cultural without question. You grew up with these behaviors and ways of thinking. Even basic things like looking before you cross the street and knocking before entering a person’s house are ingrained behaviors. In The Spirit Catches You and You Fall Down, Anne Fadiman asks the reader to make an effort to examine and identify those ingrained behaviors and assumptions, whether from an American background, a Hmong background, or any other background. It is not (always) necessary to change our behavior or to ask another to change their behavior; simply increased awareness of our own assumptions and increased sensitivity toward the Other’s assumptions will ultimately help to bridge cultural gaps and make it possible to find common ground.

Saturday, August 19, 2006

Baking: Our Sourdough, Ourselves--Part II

This is my favorite, tried and true sourdough recipe. It consistently has a sourdough flavor that is not too sharp but has just the right amount of kick. The crumb is moist and chewy--and stays that way for several days. When made in loaf pans, the crumb tends to be a bit more 'fine' and spongy. When made in a brotform, bread basket, or baguette-shape, the crumb is more airy with larger holes (though not as airy as traditional baguette). By the by, sourdough will stay fresh significantly longer than regular bread because the 'sourdough' bacteria resists mold. Bonus for those of us who don't necessarily consume an entire loaf all that quickly (though I'm sure I could if I really put my mind to it...). This bread also rocks the house as toast with butter, French toast, bread crumbs, stuffing, and other yeasted favorites.

This is a traditional hearth bread recipe with a levain made the night before and allowed to ferment overnight. Levain is a term for one of several different varieties of 'pre-ferments.' Pre-ferments contribute to the leavening of the dough and enhance the flavor and texture of the bread. They are usually a combination of flour, water, and yeast, and the different kinds of pre-ferments vary in the proportion of flour to water. Some common pre-ferments are levain, chef, sponge, starter, and poolish.

Note: If I plan it right, I like to make the levain in the morning before I go to work and then prepare the final dough in the evening up to the step where you shape the loaves. At this point, I go ahead and shape the loaves, but instead of doing the final rise, I put them in the fridge overnight. In the morning, I let them come to room temperature and continue rising (the final rise)--about one hour or so--before baking them as the recipe directs. The idea for this was inspired by the delayed-fermentation method used for some slack-dough breads. I find the overnight rise in the fridge improves just about every aspect of the bread: the crust is more firm and chewy; the crumb has gorgeous, well-developed holes; and the taste is a bit sweeter and nuttier, though still distinctively sourdough.

Traditional Pain au Levain
This recipe is gra
tefully borrowed from Bread Alone by Daniel Leader.

Levain

1 ¼ c. (6 oz) flour (either white or a blend of wheat and white)
1 ½ c. (12 oz) sourdough starter

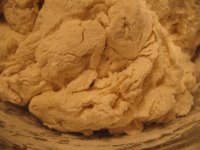
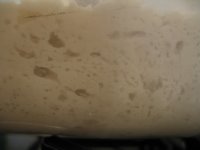
Mix this the night before and let it sit out on the counter overnight in a container with a tight lid. The levain will double or more in size, so use a container with lots of extra space. Mix all ingredients together at once. This will form a very stiff dough. (Photos on left are from after it's fermented overnight: Photo # 1) Side view of the levain through the plastic tupperware--see all the bubbles? Photo #2) Top view of the levain--kinda gross-looking, huh? That's ok. It's how it's supposed to look.)

Final Dough

2 c. (18oz) le
vain (entire batch)
2 ¼ c. (18 oz) water
4 ½ - 5 ½ c. (24 -– 29 oz) flour
(either all white or a blend of whole wheat and white)
1 tbsp ( ¾ oz) fine sea salt (if you use regular table salt, add about ¼ to ½ teaspoon extra)

Mix and knead the final dough (20-45 min): Combine the levain and the water in a 6-quart bowl. Break up the levain well with a wooden spoon or squeeze it through your fingers until broken up. Continue stirring until the levain is partly dissolved and the mixture is slightly frothy. Add 1 cup (5 oz) of the flour and stir until well combined. Add just enough of the remaining flour to make a thick mass that is difficult to stir. Turn out onto a lightly floured surface and knead:

This is what the dough looks like before you knead it.

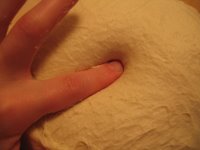
Kneading Alternative 1: (This is the traditional kneading technique you'll find in most standard cookbooks) Add salt just before you begin kneading. Begin kneading, adding remaining flour when needed, until dough is firm and smooth--—about 15 -– 17 minutes total. The dough is ready when a little dough pulled from the mass springs back quickly, or if you poke it, the impression of your finger springs back.

Kneading Alternative 2: (This is my perferred kneading techique. I find I get less tired, the dough is less sticky and uncooperative, and the final dough has better developed gluton) Knead for about five minutes. Dump some of the extra flour on the board and roll the dough in it so its nice and floury. Let it rest for 10 minutes while you gaze at it lovingly. Before the second round of kneading add the salt (I always forget this--usually I put the salt shaker in front of the dough before I let it rest so I don't forget). Fold in the salt and knead for 10 minutes. Dump a little of the extra flour on the board and roll the dough in it so its nice and floury. Let it rest for 10 minutes while you make a cuppa tea. The dough should be a little tacky during this final round, but if it starts sticking to your kneading surface or seriously gumming up your hands, add about a tablespoon of flour. The dough shouldn't require any more kneading after this, but you can tell it's ready when a little dough pulled from the mass springs back quickly, or if you poke it, the impression of your finger springs back.

After you're done kneading, the dough should be smooth and pillowy, and it should spring back if you poke it with your finger.

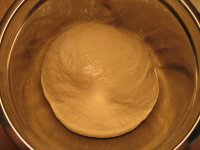
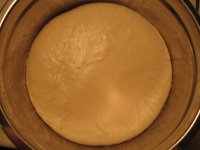
Ferment the dough (2 hours): Shape the dough into a ball and let it rest on a lightly floured surface while you scrape, clean, and lightly oil your large bowl. Place the dough in the bowl and turn once to coat with oil. Cover with a clean damp towel or plastic wrap and place in a moderately warm, draft-free place until increased in volume about one-quarter. (I usually put it in my oven--—it'’s a gas oven and usually a pretty cozy temperature. In the winter if your kitchen is cold, you can pre-heat your oven a few minutes. You should be able to comfortably rest your hand on the oven wrack. If it'’s too hot for you to touch, the oven is too hot for the rising dough and it will bake instead of rise!
This is the dough right before the first rise.
And right after the first rise.

Divide the dough and rest (35 minutes):
Deflate the dough by pushing down in the center and pulling up on the sides. Transfer the dough to a lightly floured work surface and knead briefly. Cut into 2 equal pieces, and shape each into a tight round ball and place on a lightly floured board. Let rest for about 15 minutes to relax the gluten.

Shape the final loaves and ferment (2-2.5 hours): Shape each ball of dough into desired final shape--a ball for round loaves, a 'roll' for loaves, etc. If you have a brotform, bread basket, or loaf pans, you can place the dough into these forms now. Alternatively, you can let the loaf rise 'free-form' on top of a piece of parchment paper on your counter top.
Shaped loaf in a 'brotform' or bread basket
Shaped loaf in a loaf pan

Cover with a clean damp towel or plastic wrap and let rise for about 2 hours or until the loaves have reached the desired size. Keep in mind that they will have a final burst of rising right after you put them in the hot oven! (I'’ve had many a loaf ‘spill over’ because I let them rise too long plus you risk the dough collapsing on itself and then you get a dense, brick-like final loaf. Bleck.) Forty-five minutes to an hour before baking, pre-heat the oven to 450 degrees. Be sure the oven rack is placed in the middle of the oven: —if it'’s too high, the top will burn, and if it'’s too low, the bottoms will burn. If you have a baking stone, place this on the middle rack and allow it to heat up with the oven.

After final rise
After final rise--both loaves are ready to bake

Bake the loaves (about 30 minutes): Using a sharp blade, score each loaf on the top by making several quick shallow cuts about ¼ to ½ inch deep along the surface.
Round loaf with score marks. See the ridges from the brotform? Cool, huh?!

This allows room for the crust to expand outward as the dough has its final burst of rising. Without score-marks to guide the expansion, your crust will crack on its own (see the horizontal crack marks on the side of the loaf to the left? I didn't score it properly and the crust didn't have enough expansion room. Still pretty and most definitely edible--I'm still getting the hang of this whole thang.) Slide the loaves into the oven and allow to back until the loaves are a rich caramel color (the baker's rule is that if you can see three distinct shades of brown, the loaves are done). My recipe says this takes about 25 -– 30 minutes, but I find that it'’s closer to 30 -– 35 minutes. To test the loaves for doneness, remove them from the pan and turn them upside down. Hit the bottom with your thumb. If you hear a sharp hollow sound, like knocking on a door, the bread is done. If not, bake about 5 minutes longer. Allow to cool completely on a wire rack. Don'’t be tempted to eat them right out of the oven because the loaves actually finish baking while they're cooling and the crust needs to firm up. If you cut them too soon, the loaves can get soggy and sink in on itself.

This bread keeps pretty well for about a week. Many traditional bakers abhor any kind of storage unit and say you should keep your loaves out in the air with the cut-side facing down on the counter. The crust gets really crust, but the inside (theoretically) stays moist. Loaves keep this way for a day or two, and then I personally think they're too hard to chew. I keep my loaves in big ziplock bags. The crust will take in moisture and be more chewy instead of crispy, but I usually like to toast my bread anyway. You can also freeze bread very well. I usually just put it in a big ziplock bag, squish out as much air as possible, and tuck it away. I recommend writing the date and the kind of bread on the bag with a sharpie or dry-erase marker--I started doing this was after the Christmas eve where I had about five loaves on the counter, scrutinizing them and sniffing mournfully at the frozen loaves, trying to find the sourdough loaf I KNEW was in there and really wanted to bring to Christmas dinner. *sigh* Learn from my mistakes, ladies and gentlemen.

If not quite easy-peasy, this is still relatively painless. Takes a bit of practice and perseverance, but you'll get the hang of it, I guarantee. Go forth, bake bread, god speed.

Thursday, August 17, 2006

Baking: BBQ Bacon Pizza

Another quickie post here--I'm on vacation next week and am planning on spending some good quality time with my blog. I think I've got about 10 book reviews to catch up on...

Just had to dish (pun intended, ouch!) about the pizza I made last night, hailed by such fastidious food critics as My Boyfriend the Engineer as "your best pizza yet!" We had some bacon left over from BLTs the other night, so I chopped up a couple strips, added caramelized onions, and put a bit of BBQ sauce in with the crushed tomatoes. So very yum:

Pizza Dough:
1/2 Thin Crust Pizza Dough Recipe (see this previous post)

Sauce:
4-5 hearty spoonfuls of crushed tomatoes
2 tablespoons BBQ sauce

Topping:
4-6 strips bacon, cooked crispy and chopped into chunks (Pancetta would also make a classy substitute)
1/2 onion, cut into strips, sauteed, and caramelized for about 10 minutes
~28-42 grams (a decent handful) of shredded cheese (I used Sargento's Reduced-Fat Mexican Cheese mix)
handful of fresh arugula (optional--I put this on my half; the Engineer wanted "no green stuff")

Preheat oven to 500 degrees.

Roll pizza dough out onto a piece of parchment paper to desired thickness. Spread crushed tomatoes and BBQ sauce onto dough. Top with bacon and onions.

Bake for 5 minutes. Rotate and bake for another 3 minutes. Remove from oven and sprinkle on cheese and arugula. Return to oven for another 2-3 minutes until the crust is golden brown and crackly around the edges.

Allow to cool for about 5 minutes, if you can wait that long. Cut into quarters and consume with gusto.

Monday, August 14, 2006

Garden Update!

Quickie post while I wait for the pasta to achieve the proper al dente consistency. Garden is going well. Basil is my best crop, so far. I've been using it in absolutely everything. My first round of tomatoes suffered blossom end rot, alas. In talking to my gardening friends at work and folks at the farmer's market, I hear blossom rot has been common in a lot of crops this year in New England. I guess it's been too variously hot/cold or too wet/dry, and the plants don't like it so much. I chucked most of them out to encourage new growth, but kept a couple that didn't have it too badly, figuring I could cut away the bad parts. The next round will probably be ripe in another week. A few of them have a tiny bit of rot, but nothing like this. My mom and aunt will be here on Sunday for a week-long vacation (!!!), and I'm hoping to treat them to BLT's and pasta with fresh tomato sauce featuring Emma Grown Tomatoes.

Better luck with the peppers. With them, either the blossoms rotted before the even fruit formed and they fell off, or if they stuck around, the fruit is awesome. Check 'em out! Hard to tell, but these guys are about two inches tall--so cute! Every day they seem to get bigger. Kinda scary, actually. But hopefully soon I'll have a few meals of fresh peppers! Probably won't get a very large crop from these pepper plants in the end, but it's been well worth the fun of trying to get them to grow. I already have big plans for next summer. (Famous last words, eh?)

Saturday, August 12, 2006

Baking: An Interim Sourdough Lesson

Kay, so after "Our Sourdough, Ourselves: Part I" I started getting really curious about the science behind sourdough, and really, bread baking in general. I've had some awareness of the science just from all the recipes I've read and what I've picked up talking to people, but I've never sat down to put it all together. Much of the 'science' some recipe authors give as background seems to be the stuff of legend, and there's a lot of garbled pseudo-science rumbling around out there.

Here is a little fact/fiction break down for ya, gleaned from my bread books and a bit of web research. Please feel free to correct/add/subtract/tell me I'm wrong. There's so little good info out there, I'd hate to add to the muddle. Also let me know if you have a question or come across another baking science myth--I'd love to look into it. Keep an eye on this page; I'll add new info as I go:
----------
Fiction: Adding a pinch of yeast as you begin cultivating your starter will help collect wild yeast from the air.

Fact: MEEEH! Try again! Though it sounds like fun, yeast does not happily float through the air in search of a good party. Yeast is a kind of fungus. Fungi absorb their food and reproduce asexually by division of cells (also called 'budding' or 'fission'). Yeast cells are also not mobile organisms able to seek out their food (or kinfolk); in other words, yeast has to live in or on its food in order to eat and survive. Adding a pinch of yeast to your initial starter is more like planting a seed or using a match to start a fire. Honestly, I don't think you even really need the pinch of yeast to get things going--the yeast will eventually make a home in your starter on its own. Certainly you should never need to add any commercial yeast after you've gotten your initial starter going.
----------
Fiction: Yeast eats flour.

Fact: Yeast eats sugar. Sugar comes, eventually, from the flour. Flour is made up of starch molecules (complex carbohydrates). Starch molecules are composed of many many threads of simple sugar molecules wrapped very tightly together. Something is needed to break down the starch molecules and release the sugar molecules. That "something" is an enzyme called amylase. Once the amylase breaks down the starch molecules into simple sugar, the yeast begins feeding on the sugar.
----------
Fiction: The sour taste in sourdough comes from dead yeast cells.

Fact: Honestly, I'm a little shaky on this one. Here's one definite fact: There's more than just wild yeast in them thar waters. Also in residence in your little pot 'o starter is a friendly, nonharmful bacteria called lactobacillus. The fuzziness here is that I can't figure out if the lactobacillus breaks down starch molecules into sugars for the yeast, or if enzymes still break down the starch and both the yeast and the lactobacillus feast on it. In any case, lactobacillus produce two kinds of acid as a by-product: lactic acid gives the sourdough its mellow, rich flavor and acetic acid gives sourdough its tang and punch. Another spot of fuzziness: I *think* one or the other of these acids is produced in greater abundance depending on the conditions in your starter, like whether you keep your starter in more of a liquid state or in a stiff dough. Liquidy starter (near equal balance of flour and water) makes more acetic acid and makes your sourdough more sour. A stiff starter (higher percentage of flour to water, about 2:1) makes more lactic acid and gives your final bread a more mellow, rather sweet taste.

Wild yeast doesn't actually contribute to the flavor of the sourdough at all. Wild yeast is necessary because it's made of sterner stuff than commercial yeast, which would die in the acidic environment created by the bacteria.
The wild yeast is in there as the leavening agent (in the same way that commercial yeast leavens regular bread dough), and also produces alcohol and carbon dioxide as a by-product. (The carbon dioxide is what leavens the dough--carbon dioxide molecules get trapped in the web of gluten strands and lifts the structure up.)
----------
Fiction:
Wild yeast is commercial yeast, only it lives in the air instead of a little paper packet.

Fact: Actually, wild yeast and commercial (or domesticated) yeast are two different strains of yeast entirely. Wild yeast is Saccharomyces exiguus, and commercial yeast is Saccharomyces cerevisae. Who'd a thunk it. Commercial yeast likes a near-neutral pH environment in which to do it's groove thang. Wild yeast likes the acidic environment of the sourdough. Wild yeast is also longer lived and can stand up to the longer, more rigorous process of sourdough bread baking.

Monday, August 07, 2006

Baking: Our Sourdough, Ourselves--Part I

OK, you can laugh all you like: My first memory of sourdough bread is "The San Francisco Sandwich" that the Hardee's fast food chain ran for a while back in the 90's. Now, we can stand here and debate the relative authenticity and perhaps dubious quality of sourdough bread served at a fast food chain until the cows come home. Whether it was truly the "Authentic Taste of San Francisco Sourdough" or addictive chemicals added to the dough, I was hooked.

When I first started baking a few years back, the idea of making my own sourdough bread seemed like a tall tale dreamed up to scare would-be bakers, and I regarded every sourdough recipe I came across with the appropriate amounts of reverence and trepidation. Ancestral recipes for sourdough starters and sourdough breads have a reputation for being jealously guarded, passed down through baking-family dynasties, and kept secret from all novices. There are legends of French sourdough starters that have literally been maintained for generations.

My friends, the truth is that sourdough is really, truly, verily not as scary as it sounds. No expensive 'starter' powders from foofy baking companies. No secret ingredients only available on the baker's black market. You don't need anything fancier than a tupperware container, flour, water, and a pinch of yeast to get it going. It's even easier if you can beg a cup of starter off a friend (or steal a cup from a fancy French bakery, hee hee hee).

If you feel like making it from scratch, here's how:

Creating Your Very Own Sourdough

To create the most basic sourdough starter from scratch, you need a big container (at least 2 – 3 quarts) with a lid, flour, water, a little bit of yeast. I have found
that regular, run of the mill, all-purpose, white flour works the best (I use King Arthur Flour). For a while, I kept a separate sourdough that was about half whole wheat and half white. It worked fine, but it got to be too much for a lil' home baker like me to maintain two sourdoughs starters. I’ve also seen other sourdough starter recipes that use various ingredients like milk, honey, buttermilk, molasses, salt, and even grapes (see note at end of post). All these ingredients will vary the flavor of the sourdough. I recommend starting with the basic sourdough and elaborating once you get the hang of it.

Day 1

¾ c. plus 2 tablespoons (4 oz) all-purpose, white flour
½ c. (4 oz) water (filtered is best)
a pinch moist or dry yea
st

Combine all ingredients and stir well to make a thick, soft dough. Do not add any more flour or water at this point. Scrape down the sides with a spatula,
cover with a lid, and let stand at room temperature for 24 hours. Mark the side of the container at the level of the mixture with a dry-erase marker.

Day 2

¾ c. plus 2 tablespoons (4 oz) all-purpose, white flour
½ c. (4
oz) water (filtered is best)

The starter should have doubled in volume and have tiny bu
bbles in the surface. The initial bacteria cells from that pinch of yeast have been eagerly munching on the flour and reproducing like mad. Sugar and alcohol are byproducts of their reproduction (it's more technical than this, I'm sure, but that's another post).

Add new flour and water and stir vigorously to distribute all the ingredients and add fresh oxygen. Scrape down the sides, mark the level of the starter, and cover tightly for another 24 hours.

Day 3

¾ c. plus 2 tablespoons (4 oz) all-purpose, white flour

½ c. (4 oz) water (filtered is best)

The starter should now have the texture of thick batter, s
hould have doubled in volume, and be quite bubbly. If you taste it, it will have a musty, sour flavor. It will smell of alcohol and vinegar. Mix in the fresh ingredients as with Day 2. Scrape down the sides, mark the level of the starter, and cover tightly for another 24 hours.

Day 4 and Beyond: Caring for your sourdough starter


Now your starter is ripe and ready to use. The best place to keep starter is in the fridge. The mixture will expand and contract a bit, but shouldn’t double. After a week, a clear or yellowy liquid may have formed on the surface and the starter should smell strongly of alcohol and vinegar. This is fine. If the liquid is tinted pink or smells ‘off’ then the starter has spoiled and you should throw it away and start fresh.

To nourish your starter, discard about one cup (8 oz) every week. Add in ½ cup (4 oz) of water and ¾ cup (4 oz) of flour. Mix well and store in the fridge.


TIPS: Filtered or spring water is best for starter. There are often hard minerals or chlorine in tap water that can kill or hinder the bacteria developing in the starter. On the other hand, potato water (water that you’ve used to boil potatoes) is excellent food for the bacteria and can be used in place of filtered water.

If you ever want to incre
ase the amount of your starter, you can discard less or none of your starter. It’s most important to keep adding new ‘food’ every week.

If you want to decrease the amount of your starter or if you’ve noticed that the bread you’ve been making is getting really sour, you can discard all but ¼ cup (2 oz) of the starter. Add fresh ingredients and begin to build it up again.

Starter needs to be ‘fed’ about once a week, though I’ve gone as long as two w
eeks without having it spoil. If you go away for vacation, be sure to have ask a friend or neighbor to care for it along with the plants and pets! I’ve heard that you can freeze starter for up to several months, but I’ve never tried this myself. You can also keep sourdough on the counter, but it needs to be fed more often, which isn’t so practical for the home baker.

For this and other baking adventures, I highly recommend using an electric scale to accurately measure the ingredients.

NOTE: Keep in mind that the 'sour' flavor of your final dough is affected by lots of things including how long you've been maintaining the starter, how recently it was 'fed,' the manner in which you prepared the final dough, and even how fresh your final loaf is (I've noticed that my loaves will get more distinctly sour as the week goes on). Sourdough flavor also varies depending on your location. If you have a highly refined palate (oh, la la) and access to sourdough breads from a variety of regions, you might actually noticed distinct sourdough flavors in each loaf. I'll research an actual science lesson for another post, but the general principle is that the sourdough starter interacts with the wild yeast in the air where you live. Ipso facto, a true San Francisco sourdough can really only come from San Francisco. FYI, wild yeast is visible in one form as the film on grapes (which is why you might see some starter recipes using crushed grapes in the initial starter).

Our Sourdough, Ourselves--Part II: My favorite sourdough bread recipe....Coming up!

Wednesday, August 02, 2006

Books: Gifts by Ursula LeGuin

Gifts
by Ursula LeGuin

Ok, I tried to stick to the 'Library Books Only' diet, but couldn't resist that stack of colorful, glossy books with such wonderfully tempting titles. Ah well, what can I say? I'm weak-willed like that.

Quick Synopsis: The people of the Uplands live a stark and rough existence that always borders on starvation and inter-clan warfare. Their only defense against neighboring clans and their only bargaining tool in forming alliances are the mysterious and fearsome Gifts. The Gift can be the ability to cut like a knife with only a glance, to destroy a hillside of vegetation with a single gesture, to call animals to the hunt with a thought. These hereditary powers are guarded jealously and are carefully passed down from father to son and mother to daughter. This is the way it has always been, but two children who are coming into their power begin to question whether these Gifts could be used for a greater good, rather than as mere tools in the ongoing struggle to survive.

Ursula LeGuin's strong point has always been her ability to use masterful storytelling as a vehicle for social commentary, forcing her readers to examine their own beliefs and worldviews. Again and again, her books and short stories raise probing questions about why things are the way they are. Though it might not be quite on par with Left Hand of Darkness or The Ones Who Walk Away from Omelas (short story), Gifts follows in this same tradition. Its message is familiar, though an important one for teen-people: we don't often get to choose the tools we are given, but we do get to choose how we use them.

The greatest strength in Gifts is its characters. Orrec, our main character and hero, is every bit the teenage boy teetering between childhood and adult life. He is frightened by his powers, rebellious toward his father and inheritance, and full of fiery passion--in short, a teenage girl's dreamboat. His best friend, Gry, has an equally rich character--deeply soulful and spirited. Their conversations and the dialogue between other characters in the book are natural and well-paced. LeGuin's setting in a remote, bitter landscape and descriptions of the Uplander people draw the reader even further into the world of Upland

While I firmly believe that the hallmark of a great work of writing is strong, desire-driven characters, the brilliant characters still need a plot in which to do their thing. And this is where LeGuin falls short. The book opens promisingly enough with a mid-winter, fire-side discussion between Orrec, Gry, and a mysterious stranger from the even more mysterious Lowlands. I was gleefully anticipating a dangerous hero-quest of some sort to ensue. Unfortunately, the story very quickly slides back in time to several months earlier when Orrec's gift is first awakening. We don't return to the fireside chat until the very end of the book, at which point we find out that the mysterious stranger in fact has no real bearing on the book at all and is more or less a random passerby. In my mind, this violates one of the cardinal rules of writing: If you put a dagger on the mantle in Scene 1, there better be murder by Act 2. LeGuin set the stage as if the stranger was going to have meaning in the story, but ultimately he was an unnecessary character who did not add to the book. In writing, everything should have meaning, or in all honesty, it should be cut from the manuscript. What's cardinal rule #2, 'o my fellow writers? That's right: kill your darlings.

There are some jumps and starts of minor plots throughout the rest of the book--Orrec's struggle with his father, a possible alliance with a dangerous neighbor, murder via covert use of the Gift. But this coming of age story lacks a real pivotal plot around which to make the transformation believable, and ultimately, it feels forced. The book still 'works' and is carried along by the fact that LeGuin is a brilliant storyteller with a fresh perspective on a traditional theme in young adult literature. Her ability to completely enthrall her audience with language that transports you right into the story and characters that feel like friends outweighs the slipshod crafting of the plot.